13 |
Pandora Beams
|
 13.0.0 |
Beams is part of the graphic program Pandora.
This documentation about the Beams function is meant as an interesting study
subject for all of you who are into making graphics & design or as being a programmer.
Back to main index
|
 13.0.1 |
Whenever you have questions about the explanation in
this manual you should refer to the paragraph number which is listed at the left side
column. This paragraph, which you are reading now for example, is numbered as paragraph
13.0.1
|
 13.0.2 |
This manual uses a stylesheet - please make sure that both stylesheet and Java option are set enable for your browser.
For response see  Marc Marc contact file Marc Marc contact file
All pages & contents are Copyrighted (C)1998 by Marc Marc Amsterdam
|
| | |
13.1 |
Pandora Beams
Introduction |
13.1.0 |
Introduction
When I was busy making Ambients and Aerobics, I met an interesting book on creative graphics. In this book 'Kreative Grafik auf dem Atari ST', mathematical equations were used to make 'creative' graphics. It was stuffed with graphics to support the concepts.
After an analysis of the examples from the book, I noticed that they were all based on only a couple of equations to which they made variation onto variation. I adapted one of these base equations to implement into Pandora and called it BEAM. The algorithm that has the base equation implemented is made very flexible to serve a wide range of possibilities.
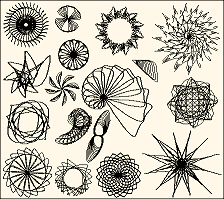
The illustrations below are showing some base elements, generated with the Beam function.
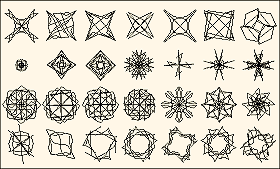
The illustrations that I made for this Beam item were limited to little images to have many of them fit into one frame -
to show you many possible variations. But, it definitely is not complete (like with all items). In particular the full screen
images are absent.
Illustration left: 'Center Beams' leading to medal like images
|
| | |
13.2 |
Pandora Beams
Menu |
13.2.0 |
Beam menu
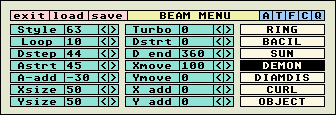
In contrast to the two previous sub menu items that we discussed, the Beam sub menu has 14 parameters instead of 9 and 7 presets instead of 12.
|
13.2.1 |
Parameters briefly
Style : Kind of logarithmic calculation.
Loop  : Amount of iterations to build up a Beam.
Dstep : Draw step (precision)
Astrt : Angle start
A-add : Angle additive after each iteration.
Xsize : Horizontal start size.
Ysize : Vertical start size.
Turbo : Acceleration additive for X and Y add.
Dstrt : Drawing start angle (begin inner loop).
D end : Drawing end angle (end inner loop).
Xmove : Horizontal shift after each iteration.
Ymove : Vertical shift after each iteration.
X add : Horizontal additive to the Xsize after each iteration.
Y add : Vertical additive to the Ysize after each iteration.
|
| | |
13.3
|
Pandora Beams
Udraw executor |
13.3.0 |
Udraw executor
In contrast to Miracles and Ambients, the Beam function 'only' knows one single drawing executing routine. It is called 'Udraw'. The Udraw routine is mentioned in Style variant listings in several issues. It was originally made to serve the Beam function and thus, the Beam item is the issue to explain more about it.
The Udraw routine offers you to interface the mathematical results of the Beam algorithm in several ways. You can control them via the menu and the keyboard. The settings will be individually memorized for each of the 7 presets of the beam menu.
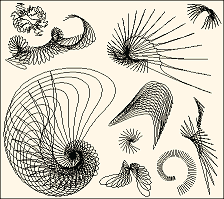
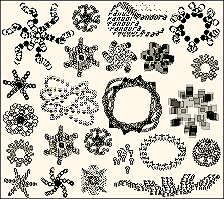
 An example of possible variation with the Udraw routine
|
13.3.1 |
Udraw controller flags
With the sub menu-head Flags {T}{F}{C} or the keys [T][F][C], in both ON SCREEN mode and ON MENU,
the Udraw executor can be controlled. The meaning of these options will be discussed.
First a brief overview of the different combinations:
|
13.3.2 |
Brief overview
 All Off      Normal use of lines.
 {T}          Text.  ^[T] to edit the text to use when ON SCREEN.
 {F}          Plot.
 {C}          Centerline additive (to mouse position).
 {F}+{C}      Plot + Centerline additive.
 {T}+{C}      Brush use.
 {T}+{F}      Filled P-font use.
 {T}+{F}+{C}  P-font use (equals T+F).
Before I continue to describe these options, notice that all functions of the Main graphical menu are in charge when executing a Beam. Remember the Line style, Pattern functions and graphical modi.
|
13.3.2 |
Text [T] {T}
If {T} is set On, Lines Instead of text will be used to be set on each calculated position. When {F} and {C} are set Off, a text with a maximum of 40 characters can be used.
|
13.3.3 |
Text style ^[1]...[+]
Whenever a drawing function uses text, you can select the text style with this keyboard function.
You actually select one of the 12 TEXT sub menu styles. ^[1] equals preset 1,
^[0] = 10, ^[-] =11 and ^[+] =12.
|
13.3.4 |
Edit text string ^[T]
When being in the ON SCREEN mode, this keyboard combination lets you edit a text string that will be used by the Udraw executor if the {T} option is active and the {F} and {C} options are NOT activated.
The text to be edited will appear at the left hand upper corner on the screen. Use any key to edit. Also the Alt[number 1...255] on the numeric keyboard section can be used. Standard for TOS editing, you can use the Cursor keys, Backspace, Space, Delete, Insert etc. when editing the text.
|
13.3.5 |
Plot [F] {F}
Plots a point on each calculated position of the Beam algorithm instead of drawing a line from one calculated point to the next one.
|
13.3.7 |
Center additive [C] {C}
When C is set On, the start position of the mouse will be seen as a 'center' point to draw extra lines to.
|
13.3.7 |
Pfont use [T] {T} & [F] {F}
When both {T} and {P} are set On, you can use one single Pfont image to be set at each calculated position. And there is more to it. Like was explained before, the {F} option also stands for "Filled". This means that the Pfont image also will be Patternized with the current selected Fill. If you do not want the effect of a Patternized Pfont image, simply select a black fill. Although the Patternize function still will be executed, the result will be as if it was not.
|
13.3.8 |
Select Pfont ^[T]
In context to the previous discussed {T}+{F} option, this keyboard function can be used when being ON SCREEN to select the Pfont image that must be used by the Udraw routine.
As an input, you can type a character on the keyboard that will be converted into an ASCII number to select the Pfont image. If you did edit the Pfont set according the ASCII numbered set, a character "a" will result in Pfont image "a". You also can edit with Alt[number] at the numeric keyboard an ASCII number within the range of 0...255. When the input editor shows up, it will not only display the typed character, but also the true Pfont image.
|
13.3.9 |
Brush use [T] {T} & [C] {C}
When both {T} and {C} are set, you can chose one single Brush to be set on each calculated position.
|
13.3.10 |
Select Brush ^[T]
In context to the previous discussed {T}+{C} option, this keyboard function can be used when being ON SCREEN to call the edit mode to edit which Brush image must be used by the Udraw routine. As an input, you can type a number - ranging 1 to 32 as being representative for the Brush index on the Brush menu.
|
13.3.11 |
Gmode
When you are using Pfont or Brush images, the Gmode settings are valid as being the extend Gmode set. Thus, the options {1} to {6} are not randomizing functions but extra graphical modi.
 Refer to the item "GMODE" to have this explained to you. Refer to the item "GMODE" to have this explained to you.
|
13.3.12 |
Examples
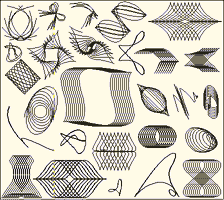
 Although, the {T} function is very powerful to create beautiful graphics, I only will give some illustrations on its effects as a hint (we need all the pages to illustrate the more 'plane' possibilities).
This illustration shows some examples of the {T}, {P} or {C} use.
|
13.3.13 |
Some remarks
You can combine the {F} and {C} option but the {F} function has a higher priority than the {C} option. Thus, if you want to activate the Brush option {C}, you have to set {P} Off. But, if you have {C} set and want to use the Pfont option {F}, you do not have to switch Off {C}.
[C] and [P] when {T} is set Off: each calculated point will be plotted and a line is drawn from this point to the mouse 'Center' position.
|
|
|
|
13.4
|
Pandora Beams
Beam parameters |
13.4.1 |
Style
With the Style parameter, one determines which equation variant will be used. I spliced the base equation up into 2 parts. The first part calculates some logarithmic 'key_values' and the second part calculates the rotation. Together they are a part of a complex algorithm in which parameters and values are changing following certain structures. Keep the table below in mind to help you to find the 'basic' Beam with its successive variants (0=basic. 1...9 = variant ect). You can also refer to the reference illustrations at the end of this issue. They display many of the basic Beam curves.
The Style index range can be divided into several divisions
00...09  50...54  75...79   095...099   130...139  160...169
10...19  55...59  80...84   100...109   140...149  170...179
20...29  60...64  85...89   110...119   150...159  180...189
30...39  65...69  90...94   120...129*  160...169  190...199
40...49
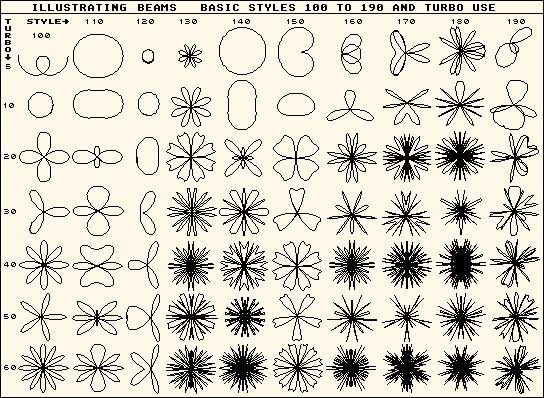
* Starting from Style 120, you have to set the Turbo parameter to a value other than zero to have these styles become effective.
|
13.4.2 |
Loop
The loop parameter sets the amount of iterations that are taken in account to build up the Beam.

|
13.4.3 |
Dstep
The Dstep parameter determine the 'point to point' resolution of the curves that are calculated (and eventually drawn). A small value will result into many points in each curve and a larger value into less.

|
13.4.3 |
Astrt
The curves can be rotated. The angle is set by the Astrt parameter. Changing it will result into another 'direction' of the curve. The image as a whole will be relatively rotated.

|
13.4.3 |
A-add
This parameter will change the angle after each iteration in the Loop. The curve yet to come will be rotated relatively to its previous one.

|
13.4.3 |
Xsize and Ysize
These two parameters determine the Horizontal (X) and Vertical (Y) start sizes of the curve. They not always must be seen as pure sizing parameters and if you change polarity, it will lead to have the curve 'mirrorized'.

|
13.4.3 |
X add and Y add
These are the additives to the Xsize and Ysize after each iteration in the loop. They able you to let the Beam image grow or shrink after each iteration.

|
13.4.3 |
Turbo
This parameter is an additive to both the X and Y add. After each iteration the X and Y add parameters increment or decrement by the Turbo value. It able you to have a grown or shrinking image in an accelerating way. It gives the Beam image Depth.
|
13.4.3 |
Dstrt and Dend
Inside the iteration Loop there is another loop. The one that calculates the curve. With the Dstart and Dend parameter you can set the calculation range of the curve to begin at a certain value and to end at a certain value.
You can see these parameters as being the start and ending angle of the curve. Imagine a circle on which you can decide where to begin and where to end. If you set the Dend parameter smaller than the Dstrt parameter, Pandora will swap the start and the end parameters to always start low and to end up high.

|
13.4.3 |
Xmove and Ymove
After each iteration in the loop, the curve to come will be shifted up in its position relatively to the start position, set by the mouse (and practically relatively to the previous curve). The Xmove sets the horizontal shift and the Ymove the vertical.

|
13.4.3 |
Moving the mouse
If you are moving the mouse during the building up of a Beam image, the drawing process will follow the mouse relatively.
|
13.4.3 |
Hold
I like to remind you to the [H] function to overcome the need to hold the mouse key during the Beam creation process
which sometimes can be time intensive.
If you have the [H] function set ON, the drawing process will start after you released  and will HOLD on until the image is ready, no matter if you release . But, it will still follow the
mouse movements. If you hit during the drawing process again, you will break the process.
and will HOLD on until the image is ready, no matter if you release . But, it will still follow the
mouse movements. If you hit during the drawing process again, you will break the process.
|
|
|
|
13.4
|
Pandora Beams
Hints
|
13.4.1 |
Where to start
As you can see, there are many possible variants on the Beam theme. How to handle them and where to start? Most of the exotic images relate to one of the basic curves.
 Thus, the best is to first set a base curve by setting the Style index to 0/10/20/30/40/50/55/60/65/70 /75/80/85/90/95/100/110 etc. Thus, the best is to first set a base curve by setting the Style index to 0/10/20/30/40/50/55/60/65/70 /75/80/85/90/95/100/110 etc.
All the parameters must be set to a 'neutral' value
 Loop=1    A_add=0    Dstrtv=0    XYadd=0
 Dstep=50  XYsize=50  Dend=360
 Astrt=0   Turbo=0    XYmove=0
Set different Styles to search for the curve to which you feel inspired by.
Then, with help of the description of the parameters, you must build up your Beam step by step.
If you find a result that you like: copy the preset to the next preset button (^[C] & click destination preset) and continue to experiment with it to make variations.
|
13.4.2 |
When creating the styles I was not only guided by my personal taste. Also a systematic way of determination was followed, aiming to cover a maximum of flexibility and possibilities. And indeed, some curves that I did prefer less than others turned out to become favorites after experimenting with the parameters some more.
|
 13.4.3 |
Whether certain curves and parameter-sets will be useful or not also depends on the purpose that you have in mind. A Beam image which is built up to be static and/or a stand-alone image requires a different character as one that will be used to draw with the mouse during the building up process.
|
14.1.4 |
If you meet basic curves that do not inspire you to experiment with, you should be careful in judging them not relevant anymore. It might be that a little change on the parameters will give you a different view.
|
14.1.5 |
Basic Curves
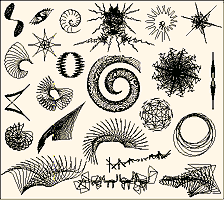
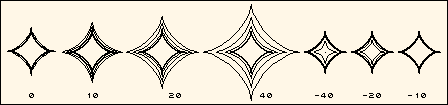
The following illustrations are references for the Basic Beam curves and also an illustration which
shows you the Turbo parameter in various amounts on the basic Beam style 100 to 190. The numbers which are displayed in the
illustration stand for the Style parameter index and its offset (+x).
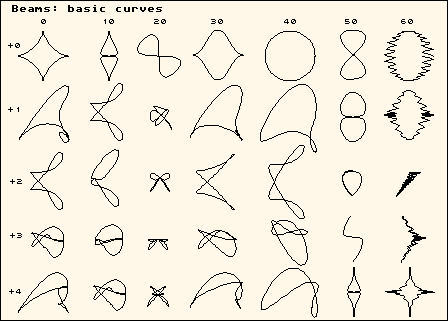
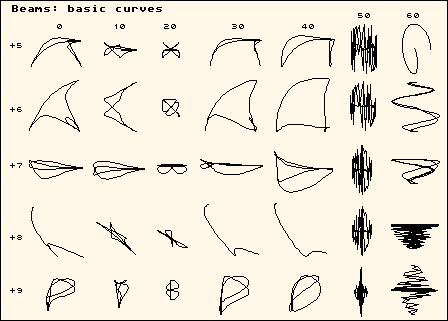
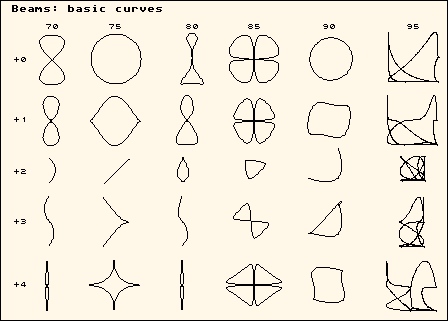

As a last reference illustration, the Styles 100 to 199 in combination with the Turbo parameter are displayed.
I like to remind you to the fact that the Turbo parameter must be set to a value other than zero to have these styles
become effective.
|
|
|
by Marc Marc (C)1991...2001
|
|